
What you will learn
What you will learnBy the end you will learn how to send and receive data from a serial port device in a browser, develop a demo web application that sends commands to a serial port microcontroller and write firmware for the AVR128DA48 microcontroller to process those commands. You can see the finished version of the project here, the sources are uploaded to repository on GitHub.
What it is and where it’s used
What it is and where it’s usedThe WebSerial API is a browser-based API that provides the ability to read and write data to a serial device. Using this API is quite easy, you only need to write a few lines of code to receive or send your data. There is also a detailed documentation with examples of how to use this API.
Thanks to this API, new possibilities open up. For example you can flash your microcontroller right from the browser which sounds really interesting (but you need to write a bootloader) or you can just output the sensor info to a web page. The possibilities are endless, it all depends on your imagination.
There are also high level APIs to access devices like a gamepad or camera. I’ll leave this link to this article which talks about a list of these APIs.
Browser support.
Browser support.As of this writing (2022), full support for this API is only available in Chromium-based browsers. You can see the full table at Can I Use.
On Android, support can be provided based on WebUSB API and Serial API polyfill.
A short excursus about UART
A short excursus about UARTBefore you work with serial port it would be nice to know the basics of UART data transfer protocol, if you are already familiar with it you can skip this part.
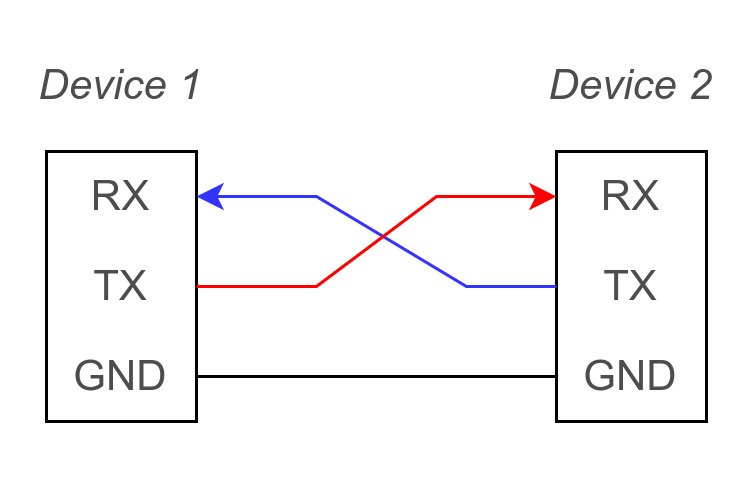
UART stands for Universal Asynchronous Receiver Transmitter and defines a protocol for sending and receiving data between two devices. Universal means that we can customize the parameters, including the baud rate. Asynchronous, on the other hand, means we have no synchronizing signal between transmitter and receiver. There is also a synchronous version of data transmission with a common clock signal, which can transmit data much faster, but it is rarely used. Only two lines are used to communicate between the two devices and these are designated as RX (receiver) and TX (transmitter).
UART transmits data one bit at a time in one of three modes:
- one-way mode - data is sent in one direction only, from transmitter to receiver
- half-duplex mode - devices can transmit and receive data one at a time
- full-duplex mode - devices can transmit and receive data simultaneously.
Since this project is supposed to use asynchronous version of the UART, then accordingly you need to set the samebit rate per second (baud rate, bps) on the two devices. The most common bit rates are: 4800, 9600, 19.2K, 57.6K, and 115.2K.
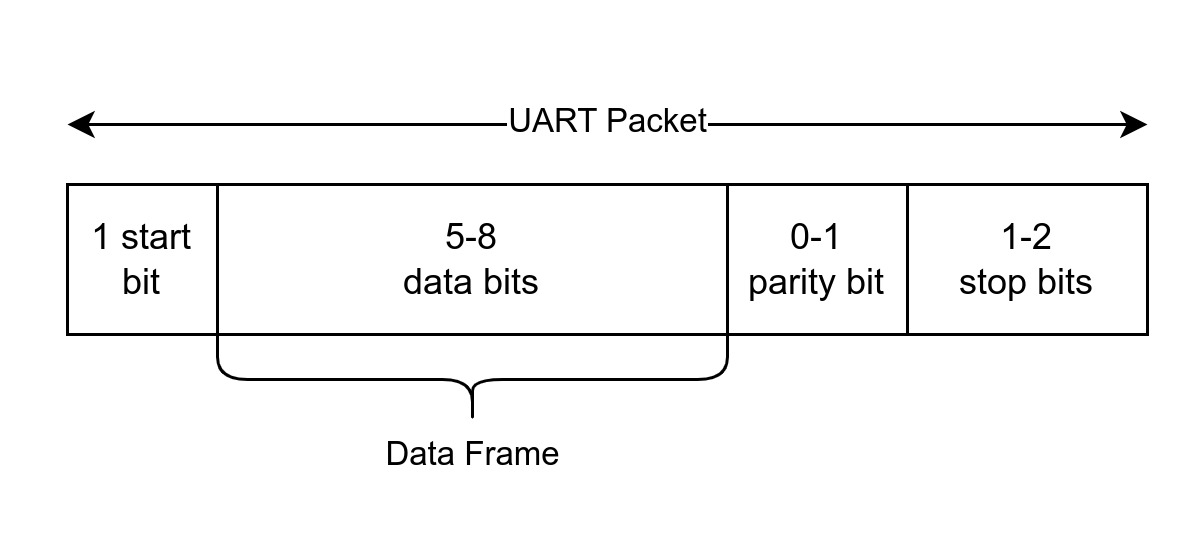
Data is transmitted in so-called packets, where each packet contains:
- start bit and stop bit - the start bit signals the arrival of data bits, the stop bit signals the end of the data, respectively.
- data bits - user data that comes right after the start bit, it can contain from 5 to 8 bits.
- the parity bit is an optional bit that comes after the data bits and before the stop bit and is used to detect errors.
I think this information is enough to understand what UART is all about. If you want to learn more about this interface there are many articles about it on the internet.
Interface Converter
Interface ConverterSince you will most likely connect the microcontroller to the USB port of your computer, you need some kind of converter between the two interfaces to send and receive data, since USB and UART are completely different data transfer protocols. There are many such translators available, here are some of them: CH340, CP2102 or FT232. If you are using an Arduino UNO debug board then you already have one of these converters on your board.
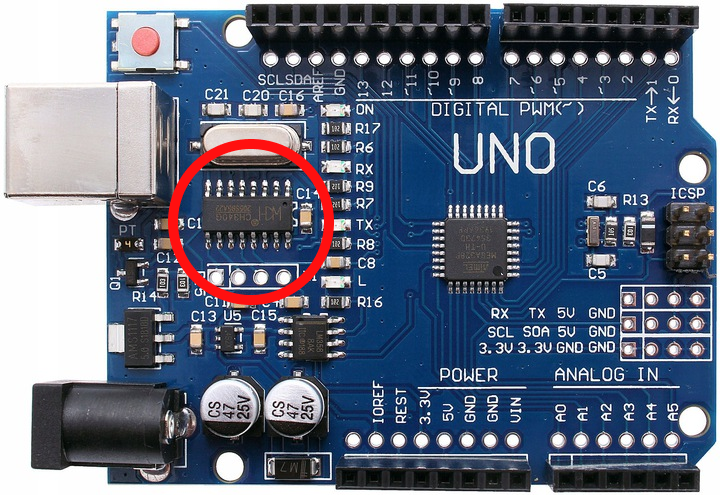
If you don’t have this interface converter on your development board, you can buy it in any store and it usually costs less than $5.
Microcontroller firmware development
Microcontroller firmware developmentAs I mentioned before the firmware will be written for the AVR128DA48 Microcontroller. It doesn’t really matter what kind of microcontroller you use, you just need to be able to send and receive data using the UART peripherals on your microcontroller.
The program will be very simple: you need to write a command handler which will take a string (like led_toggle) and call a function which will do a certain action, in this case switch the led.
The problem statement is clear, now let’s look at the implementation of this program. I will use the MPLAB X IDE and the C language to write the firmware.
Necessary constants
Necessary constantsFirst, we define a list of constants for the whole project by creating a file constants.h:
#ifndef CONSTANTS_H
#define	CONSTANTS_H

#define F_CPU           4000000UL
#define BAUD_RATE       9600
#define BUFFER_SIZE     20
#define EOT             0x04

#endif /* CONSTANTS_H */F_CPU- microcontroller clock speedBAUD_RATE- UART bit rateBUFFER_SIZE- buffer size, where we will put the incoming dataEOT- End-of-Transmission, ASCII character for the end of data transfer
USART initialization
USART initializationCreate a header file usart.h and define some functions to initialize USART, send a char and string.
#include "constants.h"

#ifndef USART_H
#define	USART_H
#define USART1_BAUD_RATE(BAUD_RATE) ((float)(64 * F_CPU / (16 * (float)BAUD_RATE)) + 0.5)

#include <avr/io.h>
#include <stdio.h>
#include <string.h>

void USART1_Initialize(void);
void USART1_SendChar(char c);
void USART1_SendString(char *str);

#endif	/* USART_H */
The macro USART1_BAUD_RATE calculates the value to write to the register USARTn.BAUD to set the baud rate. The formula is taken from documentation for the microcontroller (chapter 25.3.2.2.1, table 25-1).
Let’s implement the USART initialization function in the file usart.c:
void USART1_Initialize(void) {
  /* set baud rate */
  USART1.BAUD = (uint16_t) (USART1_BAUD_RATE(BAUD_RATE));

  /* set char size in a frame to 8 bit */
  USART1.CTRLC = USART_CHSIZE0_bm | USART_CHSIZE1_bm;

  /* config pins for TX and RX */
  PORTC.DIRSET = PIN0_bm;
  PORTC.DIRCLR = PIN1_bm;

  /* enable reveice complete interrupt */
  USART1.CTRLA = USART_RXCIE_bm;

  /* enable transmitter and receiver */
  USART1.CTRLB = USART_TXEN_bm | USART_RXEN_bm;
}
For full-duplex mode initialization of the asynchronous version of USART is as follows:
- Configuration of the baud rate by writing a value to the register
USARTn.BAUD. - Configuration of the
framesize, in our case it is 8 bits. - Configuration of the
TXpin for output andRXpin for input. - Enabling an interrupt for when the data reception is over (when one packet has arrived).
- Enabling the receiver and transmitter.
Now, let’s take a look at the functions of sending data:
void USART1_SendChar(char c) {
  while (!(USART1.STATUS & USART_DREIF_bm));

  USART1.TXDATAL = c;
}

void USART1_SendString(char *str) {
  for (size_t i = 0; i < strlen(str); i++) {
    USART1_SendChar(str[i]);
  }
}
To send data you must write one byte to the USARTn.TXDATAL register, but before doing so you must ensure that the previous transfer was completed by checking the USARTn.STATUS register. As stated in the documentation, the DREIF (Data Register Empty Flag) bit is set if the data in the TX buffer is absent. Accordingly it is possible to make an empty loop which will run as long as we have data in the TX buffer.
The send string function is a kind of wrapper which will call the send one character function.
Command Handler
Command HandlerAs you can see from the problem statement, we get a string that tells us what action should be executed.
Let’s define a header file command.h and write the following in it:
#ifndef COMMAND_H
#define	COMMAND_H

#include <avr/io.h>
#include <string.h>

#define COMMAND_SIZE 5
#define COMMAND_MAX_NAME_LENGTH 20

struct Command {
  void *addr;
  char name[COMMAND_MAX_NAME_LENGTH];
};

uint8_t command_define(void *fp, char name[COMMAND_MAX_NAME_LENGTH]);
uint8_t command_process(char *cmd_name);
void command_list(void);

#endif	/* COMMAND_H */
To solve this problem, I propose to create an array of structures, where each structure will contain a pointer to the function we need to execute, and the name of the command itself.
command_definewill create a new structure in the array.command_processwill call the corresponding function on the command name.command_listwill send information about existing commands via UART.
You can implement this by creating a file command.c as follows:
#include "command.h"
#include "usart.h"

struct Command commands[COMMAND_SIZE];
uint8_t cmd_idx = 0;

uint8_t command_define(void *fp, char name[COMMAND_MAX_NAME_LENGTH]) {
  size_t name_length = strlen(name);
  if (name_length > COMMAND_MAX_NAME_LENGTH) {
    return 0;
  }

  if (cmd_idx > COMMAND_SIZE) {
    cmd_idx = 0;
  }

  struct Command command;
  command.addr = fp;
  strcpy(command.name, name);
  commands[cmd_idx++] = command;
  return 1;
}

uint8_t command_process(char *cmd_name) {
  uint8_t i = 0;

  do {
    if (strcmp(cmd_name, commands[i].name) == 0) {
      int (*execute)();
      execute = commands[i].addr;
      execute();
      USART1_SendString("[LOG]: Command completed successfully with code \"0\".\n");
      USART1_SendChar(EOT);
      return 0;
    }
  } while (i++ < COMMAND_SIZE);

  USART1_SendString("[LOG]: Invalid command name!\n");
  USART1_SendChar(EOT);

  return 1;
}

void command_list(void) {
  USART1_SendString("[LOG]: List of available commands:\n");
  for (uint8_t i = 0; i < COMMAND_SIZE; i++) {
    if (commands[i].addr) {
      USART1_SendChar((i + 1) + '0');
      USART1_SendString(". ");
      USART1_SendString(commands[i].name);
      USART1_SendChar('\n');
    }
  }
}
It is important to note that after sending the data, you must send the EOT symbol, which will tell you that the transmission is complete, this will help in the future development of the web application.
Receiving data
Receiving dataThe last thing to do is to receive commands from USART and send them to a handler. You can use an interrupt to do this:
char buffer[BUFFER_SIZE];
volatile uint8_t buff_idx = 0;

ISR(USART1_RXC_vect) {
  if (buff_idx > BUFFER_SIZE) buff_idx = 0;
  buffer[buff_idx] = USART1.RXDATAL;
  buff_idx++;
}
When the interrupt USART1_RXC_vect is triggered, data (one byte) appears in the USART1.RXDATAL register. This byte we have to write to our fixed size buffer. There is also another way to accept data without using an interrupt. To do this simply check the bit RXCIF (USART Receive Complete Interrupt Flag) in the register USARTn.STATUS. This bit is set when there is data in the receive buffer.
In order to process incoming commands you can check the buffer in the main loop for the \n character, this character will signify the end of the command name:
while (1) {
	if (buff_idx >= 1) {
	  if (buffer[buff_idx - 1] == '\n') {
	    buffer[buff_idx - 1] = '\0';
	    command_process(buffer);
	    buff_idx = 0;
	  }
	}
}
After finding this character, you can pass the buffer to the handler, then reset the buffer index to zero. As a result, the main.c file will look like this
#include <avr/io.h>
#include <avr/interrupt.h>
#include <string.h>
#include "constants.h"
#include "command.h"
#include "usart.h"

char buffer[BUFFER_SIZE];
volatile uint8_t buff_idx = 0;

void led_toggle(void);
void hello_world(void);

ISR(USART1_RXC_vect) {
  if (buff_idx > BUFFER_SIZE) buff_idx = 0;
  buffer[buff_idx] = USART1.RXDATAL;
  buff_idx++;
}

void MCU_Init_Ports(void) {
  /* led pin PC6 to output */
  PORTC.DIRSET = PIN6_bm;
}

int main(void) {
  MCU_Init_Ports();
  USART1_Initialize();
  sei();

  command_define(led_toggle, "led_toggle");
  command_define(hello_world, "hello");
  command_define(command_list, "list");

  while (1) {
    if (buff_idx >= 1) {
      if (buffer[buff_idx - 1] == '\n') {
        buffer[buff_idx - 1] = '\0';
        command_process(buffer);
        buff_idx = 0;
      }
    }
  }
}

void led_toggle(void) {
  PORTC.OUTTGL = PIN6_bm;
}

void hello_world(void) {
  USART1_SendString("Hello world!\n");
}
After initialization of the microcontroller ports and USART it is obligatory to enable the global interrupts by calling the function sei.
With the function command_define we can define by which USART command to start the function:
led_togglewill toggle the LED.hello_worldwill output the message “Hello world”.command_listwill show a list of available commands.
Operation demonstration
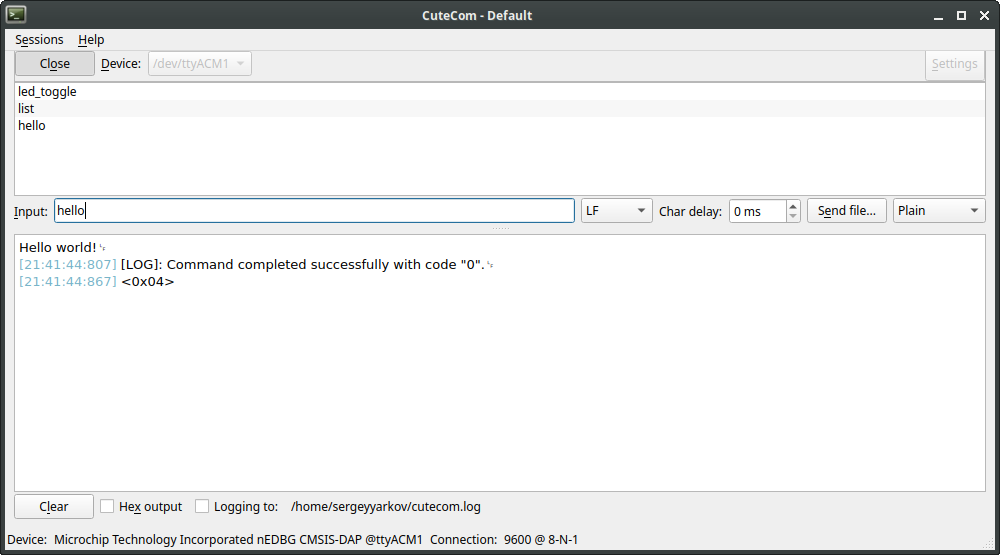
Operation demonstrationNow with the firmware assembled and loaded into your Microcontroller you can test it’s functionality. I will use the program CuteCom to open the serial port, you can use any other similar program.
Select your device from the list (in my case it is /dev/ttyACM1) and set the following parameters:
- Speed: 9600 baud
- Number of bits: 8
- Parity: None
- Stop bits: 1
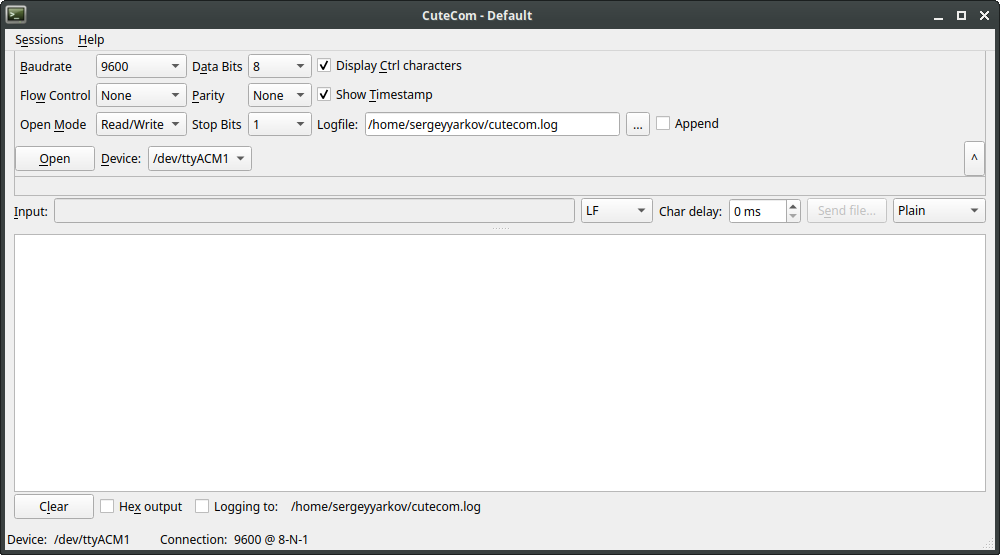
Now after opening the port you can send commands, don’t forget to set the carriage return as LF, because our firmware only recognizes the end of the command by this character.
Web application development
Web application developmentThe web application will consist of just a few elements: an input box where we can write our commands, buttons to open and close the serial port, connection status. You can see the finished version here.
Create HTML markup and styles
Create HTML markup and stylesThe HTML markup will look like this:
<!DOCTYPE html>
<html lang="en">
<head>
<meta charset="UTF-8" />
<meta http-equiv="X-UA-Compatible" content="IE=edge" />
<meta name="viewport" content="width=device-width, initial-scale=1.0" />
<title>Web Serial API Example</title>
<link href="./style.css" rel="stylesheet" />
<script defer src="./app.js"></script>
</head>
<body>
<div id="app">
<div>
<button id="connect">Connect</button>
<button id="disconnect">Disconnect</button>
</div>
<form id="terminal_form" action="#">
<label for="input">Enter command name:</label><br />
<div>
<input id="input" name="input" placeholder="e.g led_toggle" type="text" disabled />
<button name="send" type="submit" disabled>Send</button>
</div>
</form>
<textarea id="serial_log" placeholder=">" readonly></textarea>
<div id="port_info">
<div>
<p id="status">not connected</p>
</div>
<div>
<span>vendorId: <span id="vendor_id">-</span> |</span>
<span>deviceId: <span id="product_id">-</span></span>
</div>
</div>
</div>
</body>
</html>Let’s add some styles by creating a style.css file:
:root {
	--border-color: #c9d1d9;
	--border-color-hover: #6e7681;
	--font-family: monospace;
}

*,
*:before,
*:after {
	box-sizing: inherit;
}

#app {
	display: flex;
	flex-direction: column;
	width: 100%;
	max-width: 600px;
	row-gap: 5px;
}

html,
body {
	box-sizing: border-box;
	font-size: 16px;
}

body {
	display: flex;
	justify-content: center;
	margin-top: 2rem;
	font-family: var(--font-family);
}

p {
	padding: 0;
	margin: 5px;
}

input,
textarea {
	font-family: var(--font-family);
	padding: 5px 15px;
	border-radius: 4px;
	width: 100%;
	border: 1px solid var(--border-color);
}

textarea {
	resize: vertical;
	min-height: 200px;
	line-height: 1.4;
	font-size: 16px;
	outline: none;
	font-size: 12px;
}

label {
	font-size: 14px;
	font-style: italic;
}

button {
	cursor: pointer;
	background: none;
	font-family: var(--font-family);
	border: 1px solid var(--border-color);
	border-radius: 4px;
	padding: 5px 15px;
}

button:hover:not(:disabled) {
	border: 1px solid var(--border-color-hover);
}

#terminal_form div {
	display: flex;
	justify-content: space-between;
	gap: 5px;
	margin-bottom: 5px;
	margin-top: 5px;
}

#port_info {
	display: flex;
	justify-content: space-between;
	align-items: center;
	flex-wrap: wrap;
	font-size: 14px;
}

#port_info #status {
	text-transform: uppercase;
}
Creating a SerialPortHandler class
Creating a SerialPortHandler classThe logic of working with serial port will be implemented in this class, which will be a small wrapper for easy use of WebSerial API, it will have only 5 methods and a few properties.
Let’s define this class in the app.js file:
class SerialPortHandler {
	constructor(options, onConnect, onDisconnect) {
		this.encoder = new TextEncoder();
		this.decoder = new TextDecoder();
		this.onConnect = onConnect;
		this.onDisconnect = onDisconnect;
		this.options = options;
		this.port = null;
		this.isOpened = false;
		this.#setupListeners();
	}

	async open() {}

	async close() {}

	async write(data) {}

	async read() {}

	#setupListeners() {}
}TextEncoderis a class that encodes a string into an array of unsigned 8-bit integersUint8Array.TextDecoder, on the contrary, decodes into a string. We will need instances of these classes, because we will be operating with data of typeUint8Array.- The
onConnectandonDisconnectfunctions will be called when the device is connected or disconnected. - The
optionsproperty contains the necessary parameters that will be used for transmitting and receiving data. - Property
port- object which will contain methods for working with the port and information about the device after the connection is established. - The function
setupListenerswill simply add event handlers.
The following is the implementation of these methods.
Opening a serial port
Opening a serial portTo open a serial port you first need to call the requestPort method which will open a special window with a list of devices. It is also necessary that the user himself activate the call to this window, otherwise there will be an error. This can be done just by the event of pressing the button.
async open() {
  try {
    const port = await navigator.serial.requestPort();
    await port.open(this.options);

    this.port = port;
    this.isOpened = true;

    return this.port.getInfo();
  } catch (error) {
    console.error(error);
    throw error;
  }
}
You can pass an optional filter parameter to the requestPort function, which will limit the list of selectable ports according to the USB ID:
const port = await navigator.serial.requestPort({
	filters: [{ usbVendorId: 0x7522 }],
});
A list of USB IDs can be found at this.
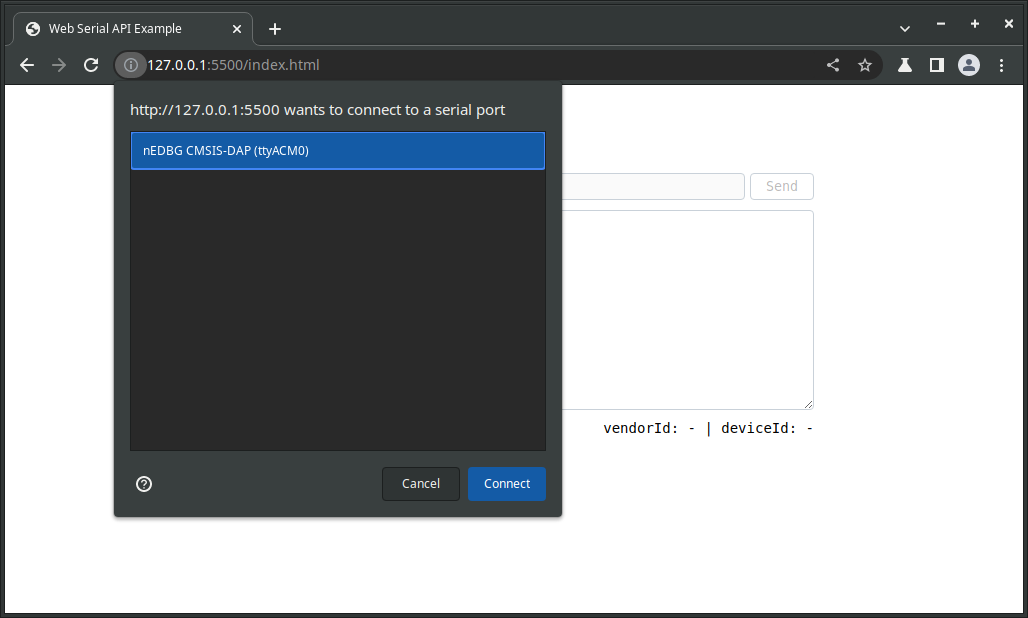
After the user has selected the device, the requestPort method returns port which can be opened by passing parameters there:
baudRate: baud rate.dataBits: number of data bits in the frame (7 or 8).stopBits: number of stop bits at the end of the packet (1 or 2).parity: parity mode (none,evenorodd).bufferSize: the size of the read and write buffers to be created.flowControl: flow control mode (noneorhardware).
The baudRate property is the only mandatory parameter, the others are optional and have default values.
At the end our method returns information about the connected device using the method getInfo.
Read data
Read dataNote that the WebSerial API is asynchronous, which prevents the user interface from locking up while accepting data.
It is also important to know that the WebSerial API uses streams Stream API. When streaming, the data is split into (chunks), this allows the data to be processed without completely waiting for it to arrive.
Receiving data can be implemented as follows:
async read() {
  while (this.port.readable) {
    const reader = this.port.readable.getReader();
    let chunks = '';

    try {
      while (true) {
        const { value, done } = await reader.read();
        const decoded = this.decoder.decode(value);

        chunks += decoded;

        if (done || decoded.includes(EOT)) {
          console.log('Reading done.');
          reader.releaseLock();
          break;
        }
      }
      return chunks;
    } catch (error) {
      console.error(error);
      throw error;
    } finally {
      reader.releaseLock();
    }
  }
}
When the user has connected to the device, this.port will have properties like writable and readable which are instances of the WritableStream and ReadableStream classes. We will need them to read and write data.
The external while loop is for error checking, such as parity checks. If a fatal error occurs, the readable property will become null.
The method getReader creates reader which will allow to get data in fragments. A readable thread has no more than one reader at a time, so after that the thread is locked, but the reader remains active.
The internal while loop reads data using the read method of the reader. This method returns the value property, which has data of type UInt8Array, and the done property, which becomes true if the serial device no longer transmits any data. Then we decode the data into a string and write it into the chunks variable. There is also a check for the EOT (End-of-Transmission) character, which means the end of the data transfer. Define this character at the beginning of the app.js file as a global variable:
var EOT = "\u0004";After the end of data reception, the thread must be unlocked by calling the releaseLock method to make the reader inactive.
Write data
Write dataIn order to send data to a serial device, you must create a writer that will provide the ability to send snippets to the writing stream:
async write(data) {
    const writer = this.port.writable.getWriter();
    const encoded = this.encoder.encode(data);
    await writer.write(encoded);
    writer.releaseLock();
  }
Before sending, you need to encode your string into data of type UInt8Array. After creating a writer, the writing thread is also locked, so after writing it must be unlocked using the same releaseLock method.
Closing a port
Closing a portYou can use the close method to close a port when communication with the device is no longer needed:
async close() {
  await this.port.close();
  this.isOpened = false;
}
The port cannot be closed when the thread that is writing or reading is blocked.
Event Handling
Event HandlingThe API allows you to subscribe to events when a trusted device connects or when it disconnects:
#setupListeners() {
  navigator.serial.addEventListener('connect', this.onConnect);
  navigator.serial.addEventListener('disconnect', this.onDisconnect);
}
Using the created class
Using the created classNow you can write the front-end part of the web application using our created class SerialPortHandler:
class Application {
	constructor(root) {
		if (!("serial" in navigator)) {
			console.error("Web Serial API is not supported in your browser.");
			return;
		}

		this.serialPortHandler = new SerialPortHandler(
			{ baudRate: 9600 },
			() => console.log("Device connected."),
			() => {
				console.log("Device disconnected.");
				this.#disconnectHandler();
			}
		);

		/**
		 * DOM Elements
		 */
		this.$root = root;
		this.$connectButton = this.$root.querySelector("#connect");
		this.$disconnectButton = this.$root.querySelector("#disconnect");
		this.$terminalForm = this.$root.querySelector("#terminal_form");
		this.$serialLog = this.$root.querySelector("#serial_log");
		this.$status = this.$root.querySelector("#status");
		this.$vendorId = this.$root.querySelector("#vendor_id");
		this.$productId = this.$root.querySelector("#product_id");

		this.#setupEvents();
	}

	/**
	 * Handlers for connecting, disconnecting and sending a command
	 */
	#setupEvents() {
		this.$connectButton.addEventListener("click", this.#connectHandler.bind(this));
		this.$disconnectButton.addEventListener("click", this.#disconnectHandler.bind(this));
		this.$terminalForm.addEventListener("submit", this.#submitHandler.bind(this));
	}

	/**
	 * Open serial port and notify user of connection status
	 * @returns {Promise<void>}
	 */
	async #connectHandler() {
		try {
			if (this.serialPortHandler.isOpened) return;
			const info = await this.serialPortHandler.open();
			console.log("Port opened: ", info);
			this.$terminalForm.elements.input.removeAttribute("disabled");
			this.$terminalForm.elements.send.removeAttribute("disabled");
			this.$vendorId.textContent = "0x" + info.usbVendorId.toString(16);
			this.$productId.textContent = "0x" + info.usbProductId.toString(16);
			this.$status.textContent = "CONNECTED";
		} catch (error) {
			this.$status.textContent = "ERROR";
		}
	}

	/**
	 * Closes the serial port and updates the connection status.
	 * @returns {Promise<void>}
	 */
	async #disconnectHandler() {
		if (!this.serialPortHandler.isOpened) return;
		await this.serialPortHandler.close();
		this.$terminalForm.elements.input.setAttribute("disabled", "true");
		this.$terminalForm.elements.send.setAttribute("disabled", "true");
		this.$vendorId.textContent = "-";
		this.$productId.textContent = "-";
		this.$status.textContent = "NOT CONNECTED";
	}

	/**
	 * Writes data to the serial port and reads the response
	 * @param {SubmitEvent} e - Form submit event
	 */
	async #submitHandler(e) {
		e.preventDefault();
		const $form = e.target;
		const data = $form.elements.input.value;
		$form.reset();
		if (this.serialPortHandler.isOpened && data) {
			this.$serialLog.innerHTML += ">" + data + "\n";
			await this.serialPortHandler.write(data + "\n");
			const message = await this.serialPortHandler.read();
			this.$serialLog.textContent += message.replaceAll(EOT, "");
			console.log("Message received: \n" + message);
		}
		this.$serialLog.scrollTo(0, this.$serialLog.scrollHeight);
	}
}
Basically there is a work with interface updates and I think it is not necessary to explain the logic in detail, I will note only the key points:
In the constructor of this class, you can determine whether the browser supports WebSerial API by checking the serial key in the navigator object, and if not, we write an error to the console. Object this.serialPortHandler will be an instance of our created class SerialPortHandler, we pass the speed 9600 and functions which will be the handlers of events to connect and disconnect the device as arguments. Then we look for the necessary DOM elements and add an event listener to some of them.
The #submitHandler method is designed to send commands and accept the result of command execution. When you use the write method, be sure to add a \n character at the end, so the program in the microcontroller knows where the command name ends.
Initialize the application at the end of the app.js file:
new Application(document.getElementById("app"));Checking the web application
Checking the web applicationYou can now send commands to the microcontroller:
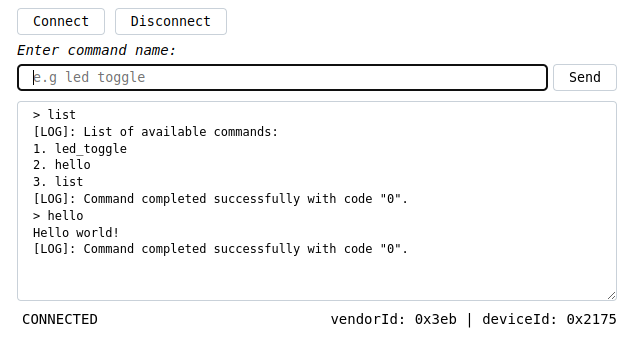
For fun, you can flash the LED:
const app = new Application(document.getElementById("app"));

setInterval(async () => {
	if (app.serialPortHandler.isOpened) {
		await app.serialPortHandler.write("led_toggle" + "\n");
		const message = await app.serialPortHandler.read();
		console.log(message);
	}
}, 500);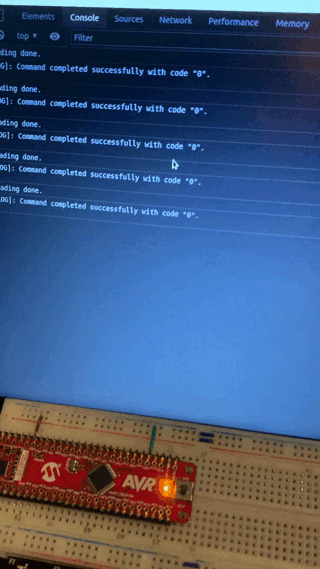
Conclusion
ConclusionHaving developed the web application we have seen that using the WebSerial API is quite easy. I hope that this article will be useful to you and help you in developing your project.